Tuesday, December 18, 2018

Christmas special offer

Christmas is almost here and the PacktPub has a great offer for you.

Every ebook, every video for only $5. Go and browse the latest titles and maybe you will find to books you will read the next year.

The ESP8266 book is in the offer. Get it and start some new IoT project in the 2019!


Sunday, September 23, 2018

ESP8266 Home Automation Projects - Errata

After the ESP8266 Home Automation Projects book was published, the wunderground.com service is not offering free services anymore, so the code presented in the Getting data from the internet part need to be reviewed.

There are two options in here: either you are subscribing to the wunderground.com service, paying a monthly subscription or you can choose other provider like OpenWeatherMap.org

Go to openweathermap.org an create an account. After login you will find your own API Key that will be used later in the code.

Now the code for getting current data is:

#include <ESP8266WiFi.h>
#include <ESP8266HTTPClient.h>
const char* ssid = "YOUR_WIFI_SSID";
const char* password = "YOUR_WIFI_PASSWORD";
const String OPENWEATHERMAP_API_KEY = "YOUR_OPENWEATHERMAP_API_KEY";
const String OPENWEATHERMAP_COUNTRY = "us";
const String OPENWEATHERMAP_CITY = "New York";
const String dataURL = "http://api.openweathermap.org/data/2.5/weather?q="+OPENWEATHERMAP_CITY+","+OPENWEATHERMAP_COUNTRY+"&APPID="+OPENWEATHERMAP_API_KEY;

void setup() {
  // put your setup code here, to run once:
  Serial.begin(115200);
  delay(10);
  Serial.println();
  Serial.println();
  Serial.print("Connecting to ");
  Serial.println(ssid);
  WiFi.begin(ssid, password);
  while (WiFi.status() != WL_CONNECTED) {
  delay(500);
  Serial.print(".");
  }
  Serial.println("");
  Serial.println("WiFi connected");
  Serial.println("IP address: ");
  Serial.println(WiFi.localIP());
  Serial.println(dataURL);

  if(WiFi.status() == WL_CONNECTED)
  {
    HTTPClient http;
    http.begin(dataURL);
    int httpCode = http.GET();
    if(httpCode> 0) {
      // HTTP header has been send and Server response header has been handled
      Serial.printf("[HTTP] GET... code: %d\n", httpCode);
      // file found at server
      if(httpCode == HTTP_CODE_OK) {
        String payload = http.getString();
        Serial.println(payload);
      }
    }
  }
}

void loop() {
  // put your main code here, to run repeatedly:
}

To check if the formed link is working, get the output from:

Serial.println(dataURL);

and check it in a browser. You should see the response in JSON format. I encourage you to test the links first in browser and later on the ESP8266.


For more information on how to get data you can access the link: https://openweathermap.org/current

At this time the free account has:

OpenWeatherMap Free Account


If you need to get the data every minute you can use the following code:

#include <ESP8266WiFi.h>
#include <ESP8266HTTPClient.h>
const char* ssid = "YOUR_WIFI_SSID";
const char* password = "YOUR_WIFI_PASSWORD";
const String OPENWEATHERMAP_API_KEY = "YOUR_OPENWEATHERMAP_API_KEY";
const String OPENWEATHERMAP_COUNTRY = "us";
const String OPENWEATHERMAP_CITY = "New York";
const String dataURL = "http://api.openweathermap.org/data/2.5/weather?q="+OPENWEATHERMAP_CITY+","+OPENWEATHERMAP_COUNTRY+"&APPID="+OPENWEATHERMAP_API_KEY;

void setup() {
  // put your setup code here, to run once:
  Serial.begin(115200);
  delay(10);
  Serial.println();
  Serial.println();
  Serial.print("Connecting to ");
  Serial.println(ssid);
  WiFi.begin(ssid, password);
  while (WiFi.status() != WL_CONNECTED) {
  delay(500);
  Serial.print(".");
  }
  Serial.println("");
  Serial.println("WiFi connected");
  Serial.println("IP address: ");
  Serial.println(WiFi.localIP());
  Serial.println(dataURL);
}

void loop() {
  // put your main code here, to run repeatedly:
  if(WiFi.status() == WL_CONNECTED)
  {
    HTTPClient http;
    http.begin(dataURL);
    int httpCode = http.GET();
    if(httpCode> 0) {
      // HTTP header has been send and Server response header has been handled
      Serial.printf("[HTTP] GET... code: %d\n", httpCode);
      // file found at server
      if(httpCode == HTTP_CODE_OK) {
        String payload = http.getString();
        Serial.println(payload);
      }
    }

  }
delay(10*6000)
}

To make use of the results you will need to parse the JSON response and extract the data you need.


Sunday, March 11, 2018

ESP8266 powered by a solar panel and a 18650 battery

On my setup described in here I've added this solar panel from Banggood. If in the past the maximum of battery operated was around 48 days on one charge, now with the help from solar panel I am expecting to run 24/7 without the need to recharge the battery myself.

The panel has dimensions 165x135x2mm and is made from monocrystalline silicon and is rated to 6W and 580 mA.
Exposing it to full sun will produce 6.54 volts and after the diode (I've used a 1N4007) will have 6.00 V.

To connect the solar panel to charger board I've cut a USB to micro-USB cable and I've soldered the part with the micro-USB to the solar panel. The micro-USB cable now can be plugged directly into the charger in its micro-USB connector.

The entire setup is now made from:

Wemos ESP8266  - 1pcs
Wemos Lithium charger board - 1pcs - this is an old version or Wemos Lithium charger board - 1pcs - the new version
BMP180 temperature and pressure sensor - 1pcs.
Battery 18650 -1pcs
Battery holder - 1pcs

The code is the same as in the original post in here.


This is the picture with the module and the LED being GREEN ( battery is fully charged )
Green LED - fully charged

And the entire module with solar panel attached to the window.

The entire module with solar power.


Just after I've added the solar panel the voltage of the battery has start to increase.

Just connected the solar panel to the charger

Now after few days you can see that what is consumed during the night and during the day when there is not enough sun will be recovered in few hour of sun. The panel is mounted to a window where is having sunlight for three four hours in the afternoon.

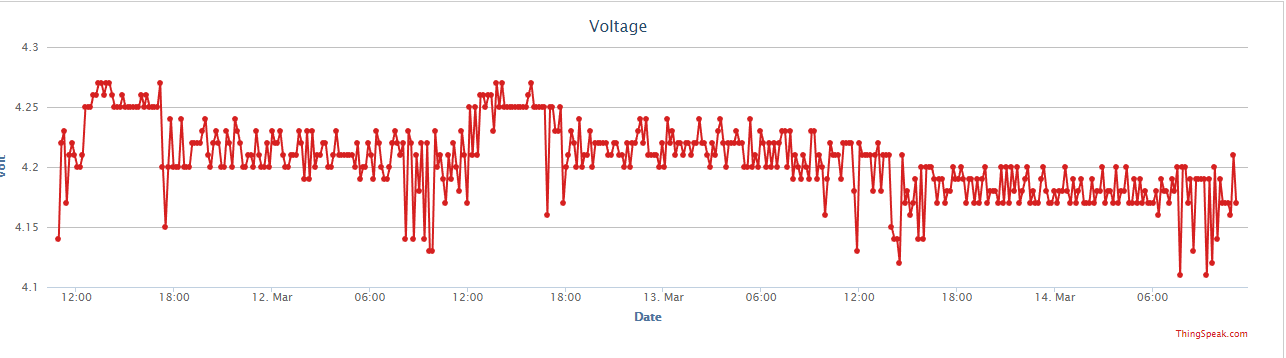
In the next picture you can see four peaks (one every day), where the charger actually stopped the charging of battery. The charger is cutting the power to the battery at 4.26 - 4.27 V. You can see that by looking to the LED on the charger board that will light green. In the led is red it means that the charger is charging the battery. If there is not enough sun the led will be off which is good because will not drain the battery.
4 days run on solar panel

Now it will run forever and I don't need to load the battery every 48 days.

This is the current voltage on my setup in real time:


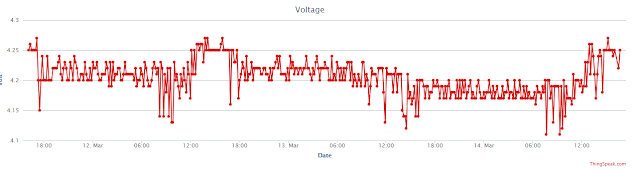
After a two days without any sun ( two days of rain) you can see that there are no peeks of fully charged. You can see this in the picture bellow.

Two days without sun, so there are no peeks

It will be interesting to see if the battery will be fully charged again in the next days with sun.

As you can see in few hours with sun the battery is full again, recovering after a two cloudy days. The LED is green again now.


LED is green again, battery is fully charged
I've let the module to work exclusively on battery for 10 days. I've reconnected the solar panel and in two hours the battery was again fully charged.

Solar panel connected after 10 days on battery


(- I will continue to update this post - )